Wednesday, July 22, 2009

Canon MP145 waste ink counter

The method used to is by reset the printer

Error ink cartridges are not installed properly (error E5) :
Step 1 : Push Power switch by continue (Push Power On/Off)
Step 2 : inserrt plug(Hold and Press Power)
step 3 : Push Reset button 1x, Let Power button, Push Reset twice till 0
Step 4 : Push + display change from 0 to 1 (push button + to change 0 to 1)
Step 5 : Push Power switch again , Printer will be print 1 page
(push power button–>start button till 1 page.)
step 6 : Open cover
Step 7 : Unplug power cable
Step 8 : Take out ink PG 40 and PG 41
Step 9 : Insert plug again
Step 10 : Push power switch
Step 11 : Open cover (scan cover)
Step 12 : Inksert ink PG 40 , PG 41 again

These are the step How to Reset waste ink counter (error E16) :
1. Turn off power button (power button is in ),
Press and Hold STOP/RESET then Push ON/OFF button
2. Hold ON/OFF button, press STOP/RESET button 2x
3. Let both of button and printer in to SERVICE MODE
4. Printer will be charging
5. After printer finish charging, ush STOP/RESET button 4x. (Waste ink counter reset)
6. Every time you push STOP/RESET button ,
ON/OFF lamp will change green and oranye.
7. Turn off printer dan and take out POWER button
8. Turn on printer again.

The number of the Reset :

button pressing LED Function Remarks
0 time Green Power off
1 time Orange Service pattern print
2 times Green EEPROM print
3 times Orange EEPROM reset
4 times Green Waste ink counter reset
5) Unplug cable power. (for MP145 / MP150)
6) Turn Off Power. (for MP160)

Error Code/Kode Error :
E2-2 = No paper (ASF)
E3-3 = Paper jam
E4 = No ink
E5-5 = The ink cartridges are not installed or a non-supported ink cartridge is installed, or the ink cartridges are not installed properly
E8 = Waste ink absorber full, or platen waste ink absorber full
E9 = The connected digital camera / video camera does not support Camera Direct Printing
E14 = The Ink cartridges whose destination are wrong
E15 = Ink cartridge is not installed E16 – Ink remaining is unknown
E16 -E19 = Failed to scan head alignment sheet
E22 = Carriage error
E23 = Paper feed error
E24 = Purge unit error
E25 = ASF(cam) sensor error
E26 = Internal temperature rise error
E27 = Waste ink absorber full or platen waste ink absorber full
E28 = Ink cartridge temperature rise error -
E29 = EEPROM error
E33 = Paper feed position error
E35 15 = USB Host VBUD overcurrent error – USB
E37 17 = Abnormal motor driver error
E40 20 = Other hardware error
E42 22 = Scanner error

Download Link : Canon Resetter
Download Driver : Canon MP145

Monday, July 20, 2009

Canon i80 Waste Ink Tank Full

Try this to reset the error.

1) Close the print head cover, and turn off the printer. While pressing the Resume/Cancel button, press the Power button. (Do not release the buttons. The LED lights in green to indicate that a function is selectable.)

2) While holding the Power button, release the Resume/Cancel button. (Do not release the Power button.)

3) While holding the Power button, press the Resume/Cancel button three times, and then release the Power and Resume/Cancel buttons. (Each time the Resume/Cancel button is pressed, the LED lights alternately in either orange or green, starting with orange.) During initialization, the LED blinks in green.

4) When the LED stops blinking and lights in green, press the Resume/Cancel button the 4 times. (Each time the Resume/Cancel button is pressed, the LED lights alternately in either orange or green, starting with orange.)

5) Press the Power button. The LED lights in green, and the
selected function is performed. (When the operation completes, the printer returns to the menu selection mode automatically.)

6) Power off then back on and test.

Canon Multi-Pass Fax C855 waste tank reset code

Tags

Resetting the Waste Ink Volume Counter

1) Enter SERVICE MODE.....By pressing THEN #.
2) Select TEST MODE.
3) Select [8] PRINTER TEST in TEST MODE.
4) Select 3. [EEPROM CLEAR].
5) Select 0. [INK COUNT]. Let the printer complete its reset cycle (about 20 seconds).
6) Turn the printer off and on by unplugging the power cord and plugging it back in.

Canon Multipass F30, F60 & F80 waste tank reset code

Resetting the Waste Ink Volume Counter


1) Enter SERVICE MODE.....By pressing Menu THEN Copy THEN #.
2) Select TEST MODE.
3) Select [8] PRINTER TEST in TEST MODE.
4) Select 3. [EEPROM CLEAR].
5) Select 0. [INK COUNT].
6) Press the [OK] key. (On F30 printers, skip step (6) since there is no [OK] key .)
7) Press the [Stop/Reset] key (returning to the state of 3)), and then press the [ON/OFF] key.

Saturday, July 18, 2009

SERVICE MANUAL CANON iR1022


High quality 22ppm black and white printing. Compact design for day to day office use. Easily Network Connected.


Manual Service : Download
Driver iR1022/1018 : Download

canon waste tank reset for canon i70


Below is a procedure that in most cases should resolve a Canon i70 waste tank issue

1) Close the print head cover, and turn off the printer. While pressing the Resume/Cancel button, press the Power button.

(Do not release the buttons. The LED lights in green to indicate that a function is selectable.)

2) While holding the Power button, release the Resume/Cancel button.

(Do not release the Power button.)

3) While holding the Power button, press the Resume/Cancel button 3 times, and then release the Power and Resume/Cancel buttons.

(Each time the Resume/Cancel button is pressed, the LED lights alternately in either orange or green, starting with orange.)

During initialization, the LED blinks in green.

4) When the LED stops blinking and lights in green, press the Resume/Cancel button 4 times (Each time the Resume/Cancel button is pressed, the LED lights alternately in either orange or green, starting with orange.)

After the function (menu) is selected, press the Power button. The LED lights in green, and the selected function is performed. (When the operation completes, the printer returns to the menu selection mode automatically.)

*** 4 times Green Waste ink counter resetting Both the main and borderless print waste ink counters are cleared.

Canon i70 InkJet Photo Printer
Manual service : Download
Driver Canon i70 : Download

MP390 Waste ink tank full

1. Printer ‘on.’
2. Press: “Additional Functions” button
Press “Scan” button
Press “Copy” button
Press “Scan” button
3. Now it says, “Service Mode / #1 SSSW.
4. Keep hitting “+” [which is the right arrow]; it will go through #1 to #11 (Date/Time), then “Service Report,” and, lastly, “Test Mode.” Then hit “Set.”
5. Now you will have another set of selections. Keep hitting “+” [the right arrow] to go from #1(DRAM) to #8 (Printer Test). Then hit “Set.”
6. When it finishes some sort of function, “Please Wait” will be replaced by “-8-2+” Then hit “+” and it should then say “-8-3+” and you hit “Set.”
7. The screen should now say “EEPROM Clear.” [You may need to press “Set” then, to get to the next step? My notes aren’t clear.]
8. Option 0 should be “select ink count.” Press “Set.”
9. Press the “Stop/Reset” button.
10. Press the “On/Off” button.
11. Wait for the printer to restart.

I have had the “waste ink tank near full” message twice in the almost-3-years I’ve been using my printer and it’s still functioning fine. No “waste ink” coming out the bottom!

Sunday, July 5, 2009

Refill Instructions HP Cartridge C9352 #22

1. Put the cartridge on some paper towels in an area where you can tolerate a spill.

2. Peal off the top label.

3. Fill the syringe with 5 ml. of color ink.

4. Very S-L-O-W-L-Y inject ink into each chamber until the sponge is full. A little ink might come out of the top when full, so cover up the other two holes while filling one.

5. When finished, replace the top label or leave it off (it will make no difference in the printing).

6. Replace the cartridge and run 1 - 3 cleaning cycles as per printer instructions.
Or print Test pages.

Wednesday, June 24, 2009

Canon PIXMA MP476 All-in-one Inkjet Printer


Design of the Canon PIXMA MP476 All-in-one Inkjet Printer


The Canon PIXMA MP476 uses the same basic design as the PIXMA MP510. The black-and-silver body measures 451 x 353 x 169mm. The silver scanner lid conceals an A4-size flatbed scanner. Because the MP476 lacks an automatic document feeder, you can't scan legal-size documents.
The paper handling system is simple. A paper input support flips open in the rear and the front panel of the printer folds open to serve as the output tray. Next to the output tray is a small door that conceals two memory card slots. The slots accept most common types of memory cards, though some require an adapter (which is not included).

Hidden away under the memory cards is a PictBridge-enabled USB port (it's so hidden that we missed it on first inspection). You can use it to connect PictBridge cameras for direct printing, or to attach an optional Bluetooth adapter (sold separately) for wireless printing. The one thing you can't attach to the USB port is a flash thumbdrive; the Dell Photo 926 lets you print files from an attached flash drive.

The control panel is hidden underneath a flip-up panel on the top side of the printer. Embedded on the underside of the panel is a 1.8-inch graphical LCD. The control panel is basic, though well-organized. Buttons include task buttons for copy, scan, and memory card modes, menu navigation buttons, and two start buttons--one for black-only and one for color.

The PIXMA MP476 uses a two-tank ink system: One black and one tri-color. It ships with regular capacity cartridges, but you can replace both with high-capacity versions.

Reset Blinking Printer Canon IP100

Tags


The methods
Step1: Manual for Service mode
1. Take of POWER cable and USB.
2. Open printer cover and Push + Hold power button
3. Put on POWER Cable
4. Close printer cover, let power button.
5. Turn on printer as usual & it should be not blinking more

Step 2 : Make it permanent
1. Connect USB cable & turn on Printer
2. Open “General Tools for iP1000″,
download click here
3. choose your USB PORT
4. Choose SET DESTINATION – 1

It should be work if u do the steps above.
Try it and Good Luck.

I'll wait ur comments.

Sunday, April 26, 2009

Canon Pixma MP110

Tags
How To Reset Waste Ink Canon Pixma MP110

Here this step by step to resetting waste ink counter printer Canon Pixma MP110
1. You will include printer.
2. press button Menu, then Scan, Copy and again Scan. All - entered into the service
regime. 3. Select Counter.
3. Press button Copy - all Pampers is discarded into zero.
4. You will turn off printer by button POWER.

Reset tool permanent for canon Pixma Mp110 Download
Manual reset canon
How_To_Reset_Waste_Ink_Canon_i320_and_i255
How_to_reset_waste_ink_canon_iP4000
How_To_Reset_Waste_Ink_Canon_Pixma_MP110
How_To_Reset_Waste_Ink_Canon_Pixma_MP130
How_To_Reset_Waste_Ink_Canon_Pixma_MPC190
How_To_Reset_Waste_Ink_Printer_Canon_BJC_2000_and_BJC_2100

reset waste ink canon iP4000

Here this step by step to resetting waste ink counter printer canon iP4000
1. With the printer plugged in and powered off, press and hold the
Resume/Cancel button, then press and hold the Power button.
Do not release the buttons. The LED light should be green to
indicate that a function is selectable
2. While holding the Power button, release the Resume/Cancel button,
do not release the Power button
3. While holding the Power button, press the Resume/Cancel button 2 times,
and then release both the Power and Resume/Cancel buttons. Each time the
Resume/Cancel button is pressed, the LED lights alternately in orange and
green, starting with orange.
4. When the LED light is green, press the Resume/Cancel button 4 times. Each
time the Resume/Cancel button is pressed, the LED lights alternately in
orange and green, starting with orange.
5. Press the Power button. The LED lights in green, and the reset is performed.
When the operation completes, the printer returns to the menu selection
mode automatically
6. Press the power button to exit service mode.

Tuesday, April 7, 2009

RESET WASTE INK TANK CANON

For seri i250, i255, i350, i355, PIXUS 350i

indicates :
WASTE INK TANK Full, printer has no respon

The Solutions :

1. Download i320 Service Tool or 350,355,250,255 Service Tool
2. Do service mode procedure to printer, the methods are ::
- Turn off printer, Take off USB cabel dan power cabel
- Push and hold POWER button, take on power, Turn on printer
- Indikator LED will be in green colour
- Push and let RESUME button, indicator LED will be in yellow colour
- Push and let RESUME button once more, indicator LED will be in green colour
- Let POWER button

This time printer in MODE SERVICE

Reset Manual i255-i355.pdf

ManualReset_i320.pdf

3. Do reset waste ink tank procedure with :
4. take on USB cabel
5. Do program General Tool
6. The Figure will be like this :
7. Choose the parameter no 1
8. Put on no 2 according to printer canon, DON”T BE WRONG!!!
9.Congratulation… printer has been in Reset.

Friday, April 3, 2009

Reset MP390 Waste Ink Full Tank


The below reset procedure worked for me. I did not have to clean the waste-ink sponge. Many thanks to lp who originally posted it and to "Anonymous" who reposted it.

1)Printer on, press Additional Functions, Scan, Copy, Scan
Now you should be in service mode from there for waste ink tank reset

2)Select Test mode which is like the last avalabe selection
3)Select #8 Printer Test, it will do something here like cleaning or something then it will come up with some other option this is where it gets a bit confusing cause now all it says is like 8-2 or 8-3 push the + or - button until it says 8-3 then hit the select button

The menu will now say EEPRON Clear
Select Ink count which is option (0) and press set

Then press Stop/Reset Followed by the power button and then wait for it to restart.

iP Tool : Download
EEPROM Printer Canon ip6210D/6220D/MP170/MP450/2200/ip600 Download
MPTool MP150/MP160/MP170/MP180/MP450/MP460 Download
Step By Step Resetter canon MP Download

Reseter Printer Canon IP1880

To reset manually Ink Full Tank, try these methods :
1. Turn on Printer Canon iP 1880
2. Push and Hold resume button about 2 minutes
3. Release resume button
4. Printer will back in normal again
5. Then use the software.
6. Good Luck friend
7. If you want this permanent, Please Download Reset Tool

8. Reset tool support Canon iP2500, iP 1800, iP 1100

Download step by step canon iR1880, iP1980
Don’t forget your comment in guest book.

Adjustment Program for Stylus C40UX ,C40SX, C20UX, C20SX Operating Instructions

Tags

1. Operating Environment:
l Windows95 OSR2.0 or higher and Windows98.
l (for Windows95)
LPT1-LPT3 are used.
(for Windows98)
LPT1-LPT3 and EPUSB1-EPUSB3 are used.
2. How to use the Adjustment Program:
Copy the Adjustment Program on the desktop, and then , execute the program.
3. Cautions:
1) When you confirm the function of USB port properly, you must use Windows98
pre-installed PC. It cannot function properly on Windows95.
2) When you operate this program on the Windows95 or Windows98, you cannot
operate it with Status Monitor is running. Close Status Monitor on Task tray
before start the Adjustment Program.
3) Do not change the setting for “Font size” in “settings tab” of the
“Display Property”window.
4) Please do not start the Adjustment Program before connecting the printer with
a parallel I/F cable or USB I/F cable.
If you do not follow the instruction, the program will freeze.
5) Please do not send any commands during Check Pattern printing.
6) In case of turning off the printer, or the parallel I/F cable or USB I/F
cable is removed during booting the Adjustment Program, please restart the Adjustment Program.

Adjustment Program for Stylus C40UX / C40SX / C20UX / C20SX : Download
Adjustment Program for Stylus C61/C62: Download

Monday, March 30, 2009

SSC Service Utility instruction

1. There will be an icon on the desktop after finishing installing
SSC Service Utility software.
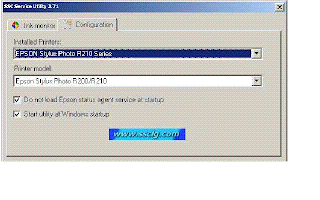
2. Click this icon; you can start the main menu as the below picture shown.

1) Choose the printer model which you’ve installed driver in the first grid.
2) Choose the corresponding printer model supported in second grid.(For some special printer models, such as
CX5100, you can choose CX5200)
3) Click the two choices in the small window below. The first one means don’t load Epson status agent service at
startup; and the second means starting utility at Windows startup.
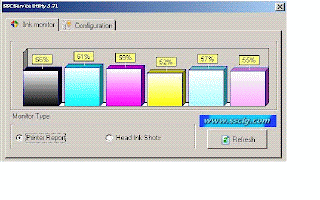
3. Click “REFRESH” and check whether ink volume is displayed as the following picture shown. If not or over
100%, it means the printer hasn’t been recognized. Then you can delete printer driver and re-install driver or
re-start the computer so that the printer can be recognized.

4. When the printer can be recognized, close the window. Then you will see a small SSCS image in the taskbar as
the below picture shown.
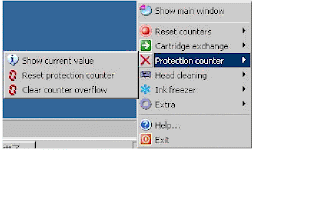
5. Click right button of mouse on SSCS image then you can start its functions.


6. “Protection counter” is the most useful function. When printer has printed lots of papers, it shall indicate, “the
components have reached its life span”. At this time, two lights on panel will blink alternatively. Actually the truth
is not like what the notice says. The reason for this problem is that EPSON has setup a “Printing Paper Record
Utility” on the mainboard. When finish printing the fixed pages, it will suggest changing the waste ink pad. In fact,
it still can be used for a long time. At this point, you can click the “Protection counter” and choose “ Reset
protection counter” to clear the records as below picture shown.
7. Click “Yes” when there a dialogue frame come out as below,.
8. Then click “OK”. The waste counter is resettled.
9. In the end, turn off printer and switch it back on again. Now you have finished the “SSC Procedure”.Download SSC

canon ir5000 photocopier printer


50 A4 ppm. Digital System Solution that seamlessly integrates across networks. Multi-tasking Copier, Printer, and Scanner.
Features of the Canon IR5000 Photocopier

* 50 ppm output
* Mailboxes - 100 available
* Scan Once Print Many
* Mixed Original Copying
* Job Build
* Reserve Jobs
* Job Notification
* 5.1 GB Hard Disk
* Remote User Interface

Further Information
Advanced architecture


Utilizing expert embedded controller technology, the Canon IR5000 photocopier is designed from the ground up to operate as a truly multi-functional unit -without single concept restraints. Thus the system is simpler to connect, monitor and control, while overall productivity and flexibility are also enhanced.

High quality, high speed
The Canon IR5000 photocopier delivers high image quality, high speed output for departmental printing and copying. This multifunctional role eliminates the need for dedicated machines, reducing investment outlay. It also offers greater flexibility for printing on different paper sizes, complete with finishing.

Superior image quality

The Canon IR5000 photocopier offers 50ppm output speed with 256-level grayscale support. Taking image quality to the next level, it incorporates innovative image enhancement technologies to deliver an amazing interpolated printing resolution of 2400 x 600 dpi.

Personal Image Server
It is possible to scan and store existing, hard copy documents onto the iR hard disk, using the Personal Image Server. These scanned documents are stored in a personal mailbox and can then be merged with documents processed on a PC. Thus creating a completely new document from two different sources.

Improved reliability
Reliability is a key element of the Canon IR5000 photocopier, ensuring consistent and continuous output. This next generation digital system is based on Canon extensive experience and proven expertise in digital and imaging technology. Complete with the back up of Canon renowned service coverage.

Full, flexible finishing
When the Canon IR5000 photocopier is configured only with an output tray, the image memory allows convenient electronic collation, with cross collated sets. A Finisher F1 is available offering a high output capacity of 2,000 sheets -in sorted, grouped or stapled mode. Up to 50 sheets can be stapled in a single set.

The Canon iR5000 brochure contains

* iR5000 performance information
* iR5000 optional extras
* iR5000 specifications
Download the iR5000 photocopier brochure Canon iR5000 brochure (342.69 kB)
Driver iR 5000/ 6000 series Download
service support tool Download iR 5000/ 6000 series
Download Repair system HDD iR 5000/ 6000 series

Monday, March 23, 2009

Service manual canon

Canon Pixma i450 service Manual Download
canon BJC 2100 service Manual Download
canon Pixma iP1500 Service Manual Download
Canon xnu i550/i850/i950 Manual service Download
Canon S100SP service Manual Download
canon BJC200 service Manual Download
canon S200SP service manual Download
canon BJC500 service manual Download
canon Pixma iP4000 service manual download

Epson R1800, R800, R2400 Waste Ink System

Tags
Epson R800/R1800 series


here is the ADJustment program for epson R800,R1800

please Download the ADj

any other....
do not forget your comment is on the waiting

Wednesday, March 11, 2009

Refill Your HP 56 Cartridge

Tags

Canon Pixma MX868

Tags


Number of Colors 5 (Pigment Black and BK/C/Y/M dye-based inks)
Printing Technology Bubble-Jet / FINE™ / Chroma Life 100™
Max. Mediasize A4 / Letter
Duplex printing Yes
Remarks Resolution up to 9600 x 2400 dpi, borderless printing
possible, Hi-Speed USB 2.0 and PictBride interface, 2,5" Color-LCD
Pages/min black Pages/min color

OEM No. OCP Ink Code Color Type
PGI-820BK under development
CLI-821BK under development
CLI-821C under development
CLI-821M under development
CLI-821Y under development

Tuesday, March 10, 2009

Canon Tutorial - Pixma MP220

Canon PIXMA® MP220 All-In-One InkJet Printer
Consumer Rating:
This standard photo all-in-one is ideal if you want to print, copy and scan at home. You can print from your memory card without a PC, thanks to the two-line LCD display .

See product details

Methods how to reset
1. Turn off the printer
2. Hold the Resume Button (red circle in the triangle),
add a printer (click “Power”) an indicator light green.
3. Hold the Power Button, release the Resume Button.
4. Not releasing the Power Button, double click “Resume” and release Both Buttons.
5. Click “Resume” for Four times
6. Once you click “Power”, to confirm the selected action (reset counter absorber). To disable the printer “Power” button to click again.

Canon Pixma MP210 Multifunctional Inkjet Printer

The goodThe good: Excellent task quality; decent task speeds, particularly photo printing; PictBridge port.

The badThe bad: No memory card slots; task feature sets aren't as fleshed out as the competitions'.

The bottom lineThe bottom line: If you're looking for the best print and scan quality from a budget all-in-one, the Canon Pixma MP210 is the one for you. Other models, however, offer more substantial feature sets.

Specifications: Office Machine Functions: Copier , Printer , Scanner ; Printer type: Multifunction printer ; Printing Technology: Ink-jet ; See full specs

canon IP4200

Try this methods to reset Printer iP4200


Hope it can help you.

Good luck

Refill kit for Canon inkjet

Monday, March 9, 2009

Chip Resetter for Canon CLI-8 and PGI-5 Cartridges


DESCRIPTION:

Chip Resetter for Canon CLI-8 and PGI-5 cartridges will reset the OEM Canon CLI-8 and Canon PGI-5 cartridge chips to "new" specs, allowing your printer to recognize the cartridge as new when you refill it. This resetter will yield thousands of successful resets, and is battery powered. Now you can finally refill the Canon CLI-8 and PGI-5 cartridges successfully, and reset the chips on the cartridges so the printer won't know the difference!

The resetter is guaranteed to work on Original brand Canon CLI8 and Original brand Canon PGI5 cartridge chips, but may not work on "compatible chips" manufactured by 3rd parties. As long as you are refilling a genuine Canon CLI8 or PGI5 cartridge, this resetter is 100% guaranteed to bring your chips back to 100% new specifications.

Chip Resetter can be used on the following inkjet Canon cartridges: PGI-5, CLI-8Bk, CLI-8C, CLI-8M, CLI-8Y, CLI-8PC, CLI-8PM, CLI-8G, CLI-8R

Thursday, March 5, 2009

Canon Service Support Tool

Tags
The SST startup screen appears.


download Service Support Tool V.201 and STT Error list
Downloaddowbload Service Support Tool V.163e
download Service Support Tool V.173e

canon iR5000 system

Tags
iR2220i/3320i
- Boot ROM 20.36N
- System 31.01N
- Message 31.01
- RUI 30.11
- HD Format 5
- G3 Fax 18.08
- MEAP 30.2

iR5000/6000
- Boot ROM 13.53
- System 17.01
- RUI 15.05
- HD Format 6

iR5000N/6000N
- System 17.01N

iR5000/6000 (with BW2)
- Boot ROM 9.28C
- System 72.01
- RUI 71.01
- HD Format 8

iR5000N/6000N (with BW2)
- Boot ROM 9.28N
- System 72.01N

iR5000i/6000i
- Boot ROM 9.28N
- System 8.02N
- Message 8.02
- RUI 8.01
- HD Format7

system canon iR3200

iR5020i/6020i
- Boot ROM 20.36N
- System 52.01N
- Message 52.01
- RUI 51.02
- HD Format 5
- MEAP 51.04

iR7200
- Boot ROM 13.33C
- System 71.01
- Message 71.01
- RUI 70.2
- HD Format 5

iR7200N
- Boot ROM 13.33N
- System 71.01N

iR8500
- Boot ROM 13.33C
- System 71.01
- Message 71.01
- RUI 70.2
- HD Format 10

iR8500N
- Boot ROM 13.33N
- System 71.01N

iR105
- Boot ROM 13.33C
- System 71.01
- Message 71.01
- RUI 70.2
- HD Format 5

iR105N
- Boot ROM 13.33N
- System 71.01N

iR C3200
- Boot ROM 4.1
- System 10.01
- Message 10.01
- RUI 9.03
- HD Format 16
- G3 Fax 51.02
- Dcon 10.02
- Rcon 4.01

iR C3200N
- Boot ROM 2.05N

canon iR system versions

iR1600/2000
Main 38.02
NIC 3
Finisher L1

iR2200/2800/3300
- Boot ROM 13.33C
- System 40.06
- Message 40.06
- RUI 40.04
- HD Format 10
- G3 Fax 18.08

iR2200N/2800N/3300N
- Boot ROM 13.33N
- System 40.06

iR2200i/3300i
- Boot ROM 13.33N
- System 20.08N
- Message 20.08
- RUI 20.05
- HD Format 4
- G3 Fax 18.08

Wednesday, March 4, 2009

Manual Service Canon Ir 5000-6000

CANON iR 5000/iR6000 ERROR CODE


These are all list of error code in Canon iR5000/iR6000 more to come, i hope your machines works fine and never get error.

* E000

Main cause: the main thermistor (TH1) has poor contact or an open circuit.The thermal switch (TP1) has an open circuit.The fixing heater has an open circuit.The SSR is faulty.The DC controller PCB faulty.Mode of detection: 0000 after the main power switch is turned on,the temperature detected by the main thermistor does not reach 70ºC.
Caution: The error must be be reset in service mode (COPIER>FUNCTION>CLEAR>ERR)

* E001

Main cause: The main thermistor (TH1) has a short circuit.The sub thermistor (TH2) has detected overheating.The SSR is faulty.The DC controller PCB is faulty.Mode of detection:0001 The main thermistor or the sub thermistor has detected about 230ºC or higher for 2 sec.0002 The main thermistor has detected 230ºC or higher (hard circuit detection)0003 The sub thermistor has detected about 236ºC or higher. Caution: The error must be be reset in service mode (COPIER>FUNCTION>CLEAR>ERR)

Friday, February 27, 2009

HP Officejet Series 7210


just bought a 7210 off Ebay for 99 pence (ex £14 delivery) within the description was "Carriage Jam" message so I knew it was faulty. 20 mins of Googling and a 5 minute clean has it up and running.

It did not involve loosening a single screw.

Okay, here's what I did...

- Switch on the printer.

- Open the print cartridge lid.

- Pull the plug from the back of the machine to avoid risk of electric shock.

- Using a light cleaning solution on a lint-free cloth, carefully VERY CAREFULLY, wipe the position strip (on both sides, front and back), then dry it with a dry lint-free cloth. Now move the cartridge carriage to the left and clean and dry the remaining half of the position strip. If you bend this position strip, your printer is knackered.

- Gently move the carriage back to the right.

- Holding down the OK and CANCEL buttons, plug in the power lead to the back of the printer and press the POWER button.

- Wait until the message DERIV CLEAR ('Deriv' is right - I'm not sure about 'clear' now) appears then release the OK and CANCEL buttons.

- The printer should thrash about a little, the carriage will move back and forth and then it should tell you the cartridges need changing and you follow the instructions, pressing OK or selecting the language options.

- It will print an alignment page and then you should be good to go.

I am a comms technician, I poke, I tweak. I don't give up.

Good Luck to you!

Tuesday, February 24, 2009

CAnon ip3000 error code 5700

5700 is a ASF cam error most likely. Here the Canon proceedure for fixing it!
DESCRIPTION: 5 Alternating Blinks (SFP) / ##356 (MFP) - ASF Cam Sensor Error
SOLUTION(S): Adjust the Screws & Main Case Unit
Movement (i.e. from shipping) may cause the plastic guide to move away from the chassis. When this
occurs, the gears cannot rotate properly causing a grinding noise and 5 alternating blinks (SFP) or ##356(MFP) - ASF Cam Sensor Error.

Procedures

Step 1: Remove the Left and Right Covers and the Main Case Unit (main cover).
Step 2: Remove the 4 mounting screws from the Chassis.
Step 3: Remove the Main Unit from the Bottom Case.
Step 4: Turn the Main Unit over (upside down) and place on work surface.
Step 5: Inspect the ASF section of the Main Unit for a gap between the white plastic
guide and the Chassis.
Note: The size of the gap varies. Even if the gap is not visible,
complete the steps below.
Step 6: Disconnect the appropriate cables and remove the Logic Board from the
Chassis.
Step 7: Loosen (do not remove) the 4 mounting screws (the mounting screws can be
found behind the logic board) on the Chassis.
Step 8: Re-seat the white plastic guide so it sits flush against the Chassis. The
tip of the white plastic guide should sit slightly inside the
Mounting screw hole. When seated correctly, the gap will no longer be
resent.
Step 9: Tighten the 4 mounting screws without causing the plastic guide to shift.
Step 10: Reassemble the printer and retest.

Sunday, February 22, 2009

cli8 pgi5 resetter canon

Wednesday, February 18, 2009

canon IRC3200 error

E751 can be displayed when a connection error of the drum unit or toner cartridge occurs. The following are the detail of each sub code. You may find it helpful to refer to them when servicing. The suffix "x" of each sub code shows color of the affected drum unit or toner cartridge. (1=Y, 2=M, 3=C, and 4=k)
- 000x: Drum unit connection error (on printer side)
- 100x: Toner cartridge connection error (on printer side)
- 010x: Drum unit memory writing error
- 110x: Toner cartridge memory writing error
- 020x: Drum unit memory data error
- 120x: Toner cartridge memory data error
- 030x: Drum unit memory writing error (The number of reties exceeds the specified value.)
- 130x: Toner cartridge memory writing error (The number of reties exceeds the specified value.)

Though it can be memory related, it looks like a E751-1003 is Toner cartridge connection error (on printer side) Check the cyan drum or the cyan toner cartridge for now. Keep us posted when you try some of the details above.

Cannon 2200/3300 Imagerunner HDD failure e602 error

The machine has a error code 602-0003

E602
1) Are the connection and the cable of the connector (J1017) on the main controller PCB and the connector (J1551) on the hard disk drive normal? NO: Correct the cable connection.Hard disk drive (HDD), Main controller PCB
2) Try replacing the hard disk drive and downloading the system software.Is the problem corrected?
YES: End. NO: Replace the main controller PCB.
3) HDD unit.
Remove the rear upper cover and the reader rear cover. Remove the three screws, and detach the cover, Remove the two screws and disconnect the two connectors then, remove the HDD unit. Remove the six screws and detach the HDD When mounting the HDD unit,be sure that the flat cable is under the plastic sheet of the HDD upper case.

Epson Stylus Photo 960 Paper Jam Sensor Repair

The first time a paper crinkled upon loading in my new printer it damaged the jam sensor and the paper light
was always blinking with no remedy and could not print. Having had Epson send me a rebuilt unit (which was
dead on arrival I decided to look for a repair – here’s what I found – Apparently this is very common with these
printers – and not that hard to fix – just a poor design on their part.
Tools needed: Long regular screwdriver, Phillips screw driver, hot glue gun (or drop of epoxy), flashlight.
1. Turn off and unplug unit.
2. First remove the top cover by carefully popping it off the hinge pins manually.
3. Remove upper housing case– here is how:
Remove 4 phillips screws total – 2 just outside of cover hinges and two inside the front of the carriage
area – all visible from the top.
Once the screws are out lift the back of the case a little then with a long screw driver reach way down in the
front corners (2) and release two barbed “catches” that hold the front of the case down – flashlight is handy
here. Work the cover up and pull the ribbon cable out of the control switch circuit board (Note colored side
of ribbon cable is towards you) and peel the cable loose where it is stuck to the case to release case now
free. Manual service download

Resetting canon cli8 / pgi5 cartridges

Thursday, February 12, 2009

Refill HP LASERJET 12A ( HP Q2612A )


Refilling these cartridges is easy and takes less than 10 minutes. Our HP Q2612A / 12A Toner Refill Bottle is easy for anyone to do.

Tuesday, February 10, 2009

Cartridge in Canon Mp210


This a the way to reset your print

* Turn off the printer
* Hold the Resume Button (red circle in the triangle), add a printer (click “Power”) an indicator light green.
* Hold the Power Button, release the Resume Button.
* Not releasing the Power Button, double click “Resume” and release Both Buttons.
* Click “Resume” for Four times
* Once you click “Power”, to confirm the selected action (reset counter absorber). To disable the printer “Power” button to click again.

Canon BJC 2100 waste ink tank full

ERROR: Uesd ink tank is full

Waste Error Reset
1: Remove the Cartridge
2: Unplug the AC Power Cord
3: Open Front access panel
3: Hold down the RESUME/RESET button and plug in the AC power cord
4: Release RESUME/RESET after plugging in the AC Power cord.
5: Press the RESUME/RESET once within 5 seconds and release the RESUME/RESET .
6: Press and HOLD RESUME/RESET for two seconds or more and release it.
7: Press and HOLD RESUME/RESET for two seconds or more and release it.
8: Unplug AC Power Cord to set data

If it does not work. Try some more times. Thanks every one above.

Friday, February 6, 2009

Canon i560 service error 5c00


This worked a treat for Canon i560


Waste Ink Counter Reset.

(1) Turn off the printer.

(2) Press and hold the RESUME button, then press and hold the POWER button.

(3) Release the RESUME button, Next press and release the RESUME button two(2) more times in succession. Note: you are still holding the POWER button). The printer's carriage will “reset" or move momentarily.

If the above was properly performed the printer will enter the "Service Mode".

(4) Press the RESUME button 4 times, this will select the clear waste ink counter function. The lamp will alternate (change) color with each key press. Next press the POWER button to "set" the change, and return to the top of the function selection menu. Press the POWER button again to restart the printer.

Refill Your HP 56 Cartridge

Thursday, February 5, 2009

Canon Pixma iP4200 manual

Tags


From the Canon Pixma iP4200 manual, downloaded

pages 28-29:

1) With the printer power turned off, while pressing the Resume/Cancel button, press and hold the Power button. (DO NOT release the buttons. The Power LED lights in green to indicate that a function is selectable.)
2) While holding the Power button, release the Resume/Cancel button. (DO NOT release the Power button.)
3) While holding the Power button, press the Resume/Cancel button 2 times, and then release both the Power and Resume/Cancel buttons. (Each time the Resume/Cancel button is pressed, the Alarm and Power LEDs light
alternately, Alarm in orange and Power in green, starting with Alarm LED.)
4) When the Power LED lights in green, press the Resume/Cancel button the specified number of time(s) according to the function listed in the table below. (Each time the Resume/Cancel button is pressed, the Alarm and
Power LEDs light alternately, Alarm in orange and Power in green, starting with Alarm LED.) [hth: I believe the power button has to be pressed once more after cycling the alarm button to complete the action. The power/resume-cancel button LEDs toggle to help you count.]

Time(s) LED indication Function Remarks
0 times Green (Power) Power off When the print head is not installed, the
carriage returns and locks in the home position capped.
1 time Orange (Alarm) Service test print See 3-4. Verification Items, (1) Service test print.
2 times Green (Power) EEPROM information print
See 3-4. Verification Items, (2) EEPROM information print.
3 times Orange (Alarm) EEPROM initialization [hth: does not re-initialize Waste ink counter]
>>>> 4 times Green (Power) Waste ink counter resetting
5 times Orange (Alarm) Destination settings [hth: not applicable]
6 times Green (Power) Print head deep cleaning (Cleaning of both black and color)
[hth: 7-10 not applicable]
11 to 13 times Orange, Green, Orange (Alarm, Power, Alarm) Return to the menu selection
14 not used in servicing
15 Orange (alarm) return to the menu selection,.

Note: If the Resume/Cancel button is pressed 16 or more times, the Alarm or Power LED lights steadily without
any changes.

[hth: if the alarm light is flashing 15 times at turn-on [cartridge not recognized error], none of these procedures seem to work. If anyone knows how to defeat this error, I would like to know.]

Wednesday, February 4, 2009

REFILL CARTRIDGE 41

If you don't understand the method to fill catridge refill 41, try this method ;


Give your comment in guest book and hope it help you friend

Refill kit for Canon inkjet

refil ink or Refill Canon Inkjet is very easy for the one who know the prosedure, but if we Don't know the method , don't try because the mechine can break.

Try the method in the video, hope it help you.

Tuesday, February 3, 2009

Eror Code CANON MF-6550


Canon Type MF-6550 Multifunction
Machine Type : Laser
Available Functions : PRINT, CANNER, COPY and FAX

PRINT
Print Speed : 20 pages per minute
Print Resolusion : 600 x 600 dpi
Printer Memory : 32 MB
Cartridge : All-in-one Cartridge FX-9
Yield of cartridge : 2300 page
Paper Tray : 250 sheets
Printing Width : 216 mm
SCANNER
Scan Speed : 1,5 msec / line ( 600 dpi )
Scanner Resolution : 600 x 1200 dpi
Scanning Width : 216 mm
Other Features : Scan to PDF, Scan to Email.
COPIER
Copy Speed : 20 copies per minute
Copy Resolution : 600 x 600 dpi.
Multiple Copy : up to 99 copies
Zoom Ratio : 50 % - 200 %
Paper Size : A4, B5, A5
FACSIMILE
Transmission Speed : 3 seconds / page at 33,6 kbps
Modem Speed : 33,6 kbps
Fax Memory : 256 pages
One touch Dials : 7 location
Coded Dials : 100
Redial : Yes
Answering Machine : Yes

Dimensions witd Tray : ( 390 x 423 x 429 ) mm
Weight : 13,4 kg

Power Max : 780 W
PowerWorking : 390 W
Power Standby : 8 W
Warm Up Time : 8 sec

Canon PGI-5 CLI-8 BCI-7e BCI-9 chip Resetter Guide


Canon PGI-5BK, CLI-8, BCI-7E and BCI-9PGBK chip resetter Learn more about the Canon chip resetter

Sunday, February 1, 2009

Canon PIXMA MP800 Error 6A00


The 6A00 is a Canon generic code for paper path jam. Some where in the paper path a sensor is activated indicating paper jam so the printer will give off a 6A00 code. As a Canon tech, I usually find the code, almost 90% of the time, is related to the purge unit being jammed with something and not being able to move. Moving the print head assembly will not clear a purge unit if its jammed with paper, paper clips, push pins, screws, cookie crisp, flower bud pods or the like. And yes I have found all those things in a purge unit. The offending item needs to be removed or the purge unit needs replacement. A Pixma MP830 would still be under Canon warranty, get it into a shop and save yourself the hassel.


Incidently, the 6A00 error pertains to all Canon printers made in the last several years, its not just used in one model. And its always a paper path error or purge unit.
I forget myself so here goes, the purge unit, called a spittoon assembly in an HP, lexmark, and other inkjet printers, is where the print head assembly parks when not in use, also its other job is to clean and make sure the print head is clean and open for printing. That is why you'll find the print head assembly parked on top of it. It also has a an electrical pump to milk the print heads and test for ink flow.

Canon Pixma Printer Driver

Restore Canon iP6210D, iP6220D, MP150, MP170, MP450, iP2200, iP1600

You can try this software to help you :

Download program

After download don't forget your comment in guest book. thanks

Saturday, January 31, 2009

Resetter Epson Stylus Photo R230, R220 and R270,

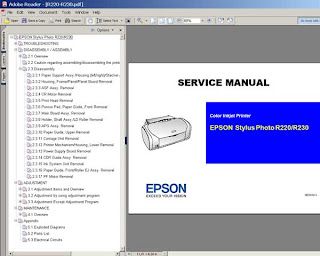
Download Service Manual Epson R230 and R220


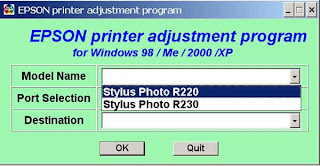
Before run adjustment program or software resetter Epson Stylus Photo R220 and R230, set date setting in your computer to 12 January 2006. Appearance of adjustment program Epson stylus photo R220 and R230 like adjustment program for Epson C45. Your Epson Stylus Photo R220 and R230 must be installed correctly in your computer before using the software otherwise so this software resetter will not be used.
Here how to use the software

* Download and extract downloaded software and run it.
* Click accept button.
* Set model name, port selection and destination setting and equal
to your printer.
* Click Maintenance Tab.
* Check mark waste ink pad counter.
* And the clear the protection counter (reset counter to zero)
* Then click Ok, Ok
* done

=> adjusment program Epson R220 - R230
=> adjusment program Epson R270
Download manual service
and any way if epson r230 blinking you can use SSC
klik at => SSC 4.3 and there are tutorial and how to use it.

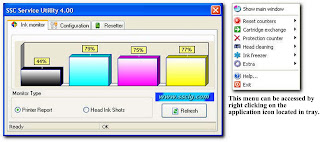
How to use the SSC Service Utility

Please to be Patient and if any one want something else please give me comment down here Ok
thanks guys 4 all comment

Thursday, January 29, 2009

Epson C110, CX7300, CX8300 & CX9300 Printer

please download these resetter below free ( you only have for post in quest book )
Epson CX9300F Adjustment
Epson CX8300 Adjustment
Epson C110 Adjustment
Epson CX7300 Adjustment

Wednesday, January 28, 2009

SSC Service Utility for Epson Stylus Printers

Please, read all instructions in help file before doing anything with Your printer!
Program screenshots:

I hope this helps some of you who are frustrated and ready to throw out your Epson printer
Problems with my Epson printer, the red and green light began flashing and a window popped up, saying, take it to your services center because some parts have reached the end of their life.
Printer companies set a “protection counter” on all printers , it’s an internal counter measuring the amount of ink wasted by head cleaning.

Reset the "protection counter" as well as clean the “waste ink pad overflow”.

1. Unplug the power and USB cables from the printer. Pry open the printer,
careful not to break anything. Use a flat blade screwdriver to pry it apart;
there are two-three tabs at the back and two at the front. Gently push them in,
and then using a bit of force pry apart the cover.
2. Next remove the two (2) waste ink pads.
They are located at the back on the left hand side. I used the flat blade
screwdriver to lift up the ink pads (they were soaked).
Please use rubber gloves as it gets very messy.
3. Next wash them with just plain hot water until they are white again.
I just let the hot water run on them (the pads are about three inches long).

4. Once washed dry them using a hair drier. (you could place it the sun for
a few hours or on top of your heater or maybe in a heated oven; (make sure you do
not set it on fire with too much heat).
5. Once dried place the pads back in the ink waste bin at the back of the printer.
6. Closed the printer cover and put back all the pieces and plug in the USB
& power cable and turned it on. (Yes the lights are still flashing).
7. Go to this link and download this software.want to download software (v4.30)
8. Install the software and run it.
9. Select your printer and model number. It will ask if you replaced with new pads;
say “YES”. Then close the window.
10. Now right click on the SSC service utility, it looks like
a printer icon near your clock in the task bar.
11. Then click on reset counters. You can do all other stuff with this utility too.
12. Turn off the printer power and then turn it on again.
If necessary un-plug the power cord from the back of the printer,
wait 20 seconds. Plug it back in.
13. IT WORKS AGAIN.

Canon PIXMA iP4680


Quality Comes Faster
• 4 x 6” (4R) borderless photo in approx. 20 sec
• Capable of printing borderless photos up to A4 size

Advance Media Handling
• Auto Duplex Printing encourages printing on both sides to save paper
• Two Way Paper Feeding offering you convenience and time savings
• CD/DVD Direct Printing – customize and print your very own CD/DVD labels at home
Memories That Won't Fade
• ChromaLife 100+ technology - photos can last up to 300 years
Connectivity
• PictBridge
• USB 2.0 Hi-Speed
Free Software Sets Your Creativity Free
• Easy-PhotoPrint Ex
• CD Label Print
Environmental Friendly
• Conforms to EU RoHS
• Supports International Energy Star Program

Tuesday, January 27, 2009

Resetter Canon MPC190

Reset Waste Ink
1) Enter SERVICE MODE.
By pressing Menu, Copy, Scan, Copy, Copy
2) Select TEST MODE.
3) Select [8] PRINTER TEST in TEST MODE.
4) Select 3. [EEPROM CLEAR].
5) Select 0. [INK COUNT].
6) Press the [Set] key.
7) Press the [Stop/Reset] key (returning to the state of 3)), and then press the [ON/OFF] key.

Saturday, January 24, 2009

Reset Ink Level pada Canon MP150


1) With the printer powered off but connected to a power source, press the Power button while pressing and holding the Stop/ Reset button.
2) When the Power is lit, press the Stop/Reset button two times while pressing and holding the Power button.
3) When releasing the Power button and the Stop / Reset button (regardless of order), the printer will move into a service mode. (Waiting for menu selection)
4) When the on/off lights in green, press the Stop/Reset button the specified number of time(s) according to the
function listed in the table below.(Each time the Stop/Reset button is pressed, the LED lights alternately in
orange and green, starting with orange.)note: press 4 times for waste ink counter reset.

The number of the Reset button pressing
LED Function Remarks
0 time Green Power off
1 time Orange Service pattern print
2 times Green EEPROM print
3 times Orange EEPROM reset
4 times Green Waste ink counter reset
5 Turn off the printer.( it must be turn off)and then turn it on again.

Wednesday, January 21, 2009

ERROR CODE CANON MP145


Error Code :
E2-2 = No paper (ASF)
E3-3 = Paper jam
E4 = No ink
E5-5 = The ink cartridges are not installed or a non-supported ink cartridge is installed, or the ink cartridges are not installed properly
E8 = Waste ink absorber full, or platen waste ink absorber full
E9 = The connected digital camera / video camera does not support Camera Direct Printing
E14 = The Ink cartridges whose destination are wrong
E15 = Ink cartridge is not installed E16 - Ink remaining is unknown
E16 -E19 = Failed to scan head alignment sheet
E22 = Carriage error
E23 = Paper feed error
E24 = Purge unit error
E25 = ASF(cam) sensor error
E26 = Internal temperature rise error
E27 = Waste ink absorber full or platen waste ink absorber full
E28 = Ink cartridge temperature rise error -
E29 = EEPROM error
E33 = Paper feed position error
E35 15 = USB Host VBUD overcurrent error - USB
E37 17 = Abnormal motor driver error
E40 20 = Other hardware error
E42 22 = Scanner error

ERROR CODE AND RESET CANON MP150 MP160


E9 The connected digital camera / video camera does not support Camera
Direct Printing
E14 The Ink cartridges whose destination are wrong
E15 Ink cartridge is not installed E16 - Ink remaining is unknown
E16 -E19 Failed to scan head alignment sheet
E22 Carriage error
E23 Paper feed error
E24 Purge unit error
E25 ASF(cam) sensor error
E26 Internal temperature rise error
E27 Waste ink absorber full or platen waste ink absorber full
E28 Ink cartridge temperature rise error -
E29 EEPROM error
E33 Paper feed position error
E35 15 USB Host VBUD overcurrent error - USB
E37 17 Abnormal motor driver error
E40 20 Other hardware error
E42 22 Scanner error

Tuesday, January 20, 2009

Reset CANON PG40 PG41 ink counter cartrige


Try this
Dowload

Power off printer
Hold down STOP/RESET button then Press and Hold down Power button
Keep Power button down and Release STOP/RESET button
Push STOP/RESET button twice
Wait 20-30 seconds - our LED showed Idle
Push STOP/RESET button four times
Push Power button twice
Power off
Next time the printer is started the waste count will have been reset

Monday, January 19, 2009

Canon MP110


step by step
Reset Printer Canon MP110

1. Enter SERVICE MODE By pressing Menu-Scan-Copy-Scan
2. Enter NVRAM by pressing <--- or ---> then OK
3. Enter CMY ink level by pressing <--- or ---> then OK
4. Select 1 by pressing <--- or ---> then OK
5. Enter K ink level by pressing ---> then OK
6. Select 1 by pressing <--- or ---> then OK
7. Press reset ( design: // )

RESET CANON IX4000,IX5000


The PIXMA iX4000 lets you enjoy high-quality photo and document printing up to A3+.

As part of the PIXMA range, the iX4000 is built with FINE (Full-photolithography Inkjet Nozzle Engineering) technology which ejects consistent 2 picolitre ink droplets with remarkable accuracy for smoother, sharper and more detailed images.

The iX4000 is the perfect solution for the home or business who want to print large format documents, graphics and photos at an affordable price.

The service manual consists of the following chapters

-Maintenance
-Technical Reference
-Appendix

download resetter ix4000,ix5000

Saturday, January 10, 2009

Printer Epson Stylus T11


Description
Print speed : Up to 22 ppm black & up to 13 ppm color
Print quality : Up to 1440 rendered dpi black / 5760 dpi color
Cartridge : 73N Black / Cyan / Magenta / Yellow L (91N optional)
Paper Output : A4, A5, A6, C6, DL
PC/MAC Compatible, USB Connectivity, Weight 3.30 kg.


Download Adjustment program epson

Source :Download SSCL.com download software (v4.30)

Printer Canon Pixma iP3680


Description
Spesifikasi Printer Canon iP3680 :

Print speed : Up to 26 ppm black & up to 17 ppm color
Print quality : Up to 2400 rendered dpi black / 9600 dpi color
Cartridge : PGI 820 Black / CLI 821 Black, Cyan, Magenta, Yellow
Paper Output : A4, A5, A6, C6, DL
Duty Cycle : Up to 1000 pages
PC/MAC Compatible, Pictbridge, USB Connectivity, Weight 5.60 kg