Saturday, January 31, 2009

Resetter Epson Stylus Photo R230, R220 and R270,

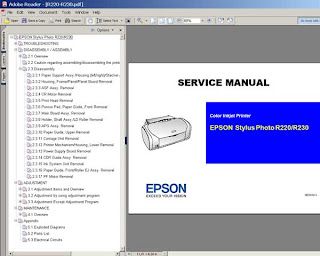
Download Service Manual Epson R230 and R220


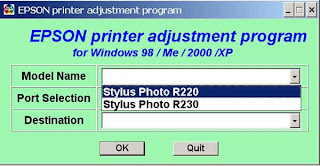
Before run adjustment program or software resetter Epson Stylus Photo R220 and R230, set date setting in your computer to 12 January 2006. Appearance of adjustment program Epson stylus photo R220 and R230 like adjustment program for Epson C45. Your Epson Stylus Photo R220 and R230 must be installed correctly in your computer before using the software otherwise so this software resetter will not be used.
Here how to use the software

* Download and extract downloaded software and run it.
* Click accept button.
* Set model name, port selection and destination setting and equal
to your printer.
* Click Maintenance Tab.
* Check mark waste ink pad counter.
* And the clear the protection counter (reset counter to zero)
* Then click Ok, Ok
* done

=> adjusment program Epson R220 - R230
=> adjusment program Epson R270
Download manual service
and any way if epson r230 blinking you can use SSC
klik at => SSC 4.3 and there are tutorial and how to use it.

How to use the SSC Service Utility

Please to be Patient and if any one want something else please give me comment down here Ok
thanks guys 4 all comment

Thursday, January 29, 2009

Epson C110, CX7300, CX8300 & CX9300 Printer

please download these resetter below free ( you only have for post in quest book )
Epson CX9300F Adjustment
Epson CX8300 Adjustment
Epson C110 Adjustment
Epson CX7300 Adjustment

Wednesday, January 28, 2009

SSC Service Utility for Epson Stylus Printers

Please, read all instructions in help file before doing anything with Your printer!
Program screenshots:

I hope this helps some of you who are frustrated and ready to throw out your Epson printer
Problems with my Epson printer, the red and green light began flashing and a window popped up, saying, take it to your services center because some parts have reached the end of their life.
Printer companies set a “protection counter” on all printers , it’s an internal counter measuring the amount of ink wasted by head cleaning.

Reset the "protection counter" as well as clean the “waste ink pad overflow”.

1. Unplug the power and USB cables from the printer. Pry open the printer,
careful not to break anything. Use a flat blade screwdriver to pry it apart;
there are two-three tabs at the back and two at the front. Gently push them in,
and then using a bit of force pry apart the cover.
2. Next remove the two (2) waste ink pads.
They are located at the back on the left hand side. I used the flat blade
screwdriver to lift up the ink pads (they were soaked).
Please use rubber gloves as it gets very messy.
3. Next wash them with just plain hot water until they are white again.
I just let the hot water run on them (the pads are about three inches long).

4. Once washed dry them using a hair drier. (you could place it the sun for
a few hours or on top of your heater or maybe in a heated oven; (make sure you do
not set it on fire with too much heat).
5. Once dried place the pads back in the ink waste bin at the back of the printer.
6. Closed the printer cover and put back all the pieces and plug in the USB
& power cable and turned it on. (Yes the lights are still flashing).
7. Go to this link and download this software.want to download software (v4.30)
8. Install the software and run it.
9. Select your printer and model number. It will ask if you replaced with new pads;
say “YES”. Then close the window.
10. Now right click on the SSC service utility, it looks like
a printer icon near your clock in the task bar.
11. Then click on reset counters. You can do all other stuff with this utility too.
12. Turn off the printer power and then turn it on again.
If necessary un-plug the power cord from the back of the printer,
wait 20 seconds. Plug it back in.
13. IT WORKS AGAIN.

Canon PIXMA iP4680


Quality Comes Faster
• 4 x 6” (4R) borderless photo in approx. 20 sec
• Capable of printing borderless photos up to A4 size

Advance Media Handling
• Auto Duplex Printing encourages printing on both sides to save paper
• Two Way Paper Feeding offering you convenience and time savings
• CD/DVD Direct Printing – customize and print your very own CD/DVD labels at home
Memories That Won't Fade
• ChromaLife 100+ technology - photos can last up to 300 years
Connectivity
• PictBridge
• USB 2.0 Hi-Speed
Free Software Sets Your Creativity Free
• Easy-PhotoPrint Ex
• CD Label Print
Environmental Friendly
• Conforms to EU RoHS
• Supports International Energy Star Program

Tuesday, January 27, 2009

Resetter Canon MPC190

Reset Waste Ink
1) Enter SERVICE MODE.
By pressing Menu, Copy, Scan, Copy, Copy
2) Select TEST MODE.
3) Select [8] PRINTER TEST in TEST MODE.
4) Select 3. [EEPROM CLEAR].
5) Select 0. [INK COUNT].
6) Press the [Set] key.
7) Press the [Stop/Reset] key (returning to the state of 3)), and then press the [ON/OFF] key.

Saturday, January 24, 2009

Reset Ink Level pada Canon MP150


1) With the printer powered off but connected to a power source, press the Power button while pressing and holding the Stop/ Reset button.
2) When the Power is lit, press the Stop/Reset button two times while pressing and holding the Power button.
3) When releasing the Power button and the Stop / Reset button (regardless of order), the printer will move into a service mode. (Waiting for menu selection)
4) When the on/off lights in green, press the Stop/Reset button the specified number of time(s) according to the
function listed in the table below.(Each time the Stop/Reset button is pressed, the LED lights alternately in
orange and green, starting with orange.)note: press 4 times for waste ink counter reset.

The number of the Reset button pressing
LED Function Remarks
0 time Green Power off
1 time Orange Service pattern print
2 times Green EEPROM print
3 times Orange EEPROM reset
4 times Green Waste ink counter reset
5 Turn off the printer.( it must be turn off)and then turn it on again.

Wednesday, January 21, 2009

ERROR CODE CANON MP145


Error Code :
E2-2 = No paper (ASF)
E3-3 = Paper jam
E4 = No ink
E5-5 = The ink cartridges are not installed or a non-supported ink cartridge is installed, or the ink cartridges are not installed properly
E8 = Waste ink absorber full, or platen waste ink absorber full
E9 = The connected digital camera / video camera does not support Camera Direct Printing
E14 = The Ink cartridges whose destination are wrong
E15 = Ink cartridge is not installed E16 - Ink remaining is unknown
E16 -E19 = Failed to scan head alignment sheet
E22 = Carriage error
E23 = Paper feed error
E24 = Purge unit error
E25 = ASF(cam) sensor error
E26 = Internal temperature rise error
E27 = Waste ink absorber full or platen waste ink absorber full
E28 = Ink cartridge temperature rise error -
E29 = EEPROM error
E33 = Paper feed position error
E35 15 = USB Host VBUD overcurrent error - USB
E37 17 = Abnormal motor driver error
E40 20 = Other hardware error
E42 22 = Scanner error

ERROR CODE AND RESET CANON MP150 MP160


E9 The connected digital camera / video camera does not support Camera
Direct Printing
E14 The Ink cartridges whose destination are wrong
E15 Ink cartridge is not installed E16 - Ink remaining is unknown
E16 -E19 Failed to scan head alignment sheet
E22 Carriage error
E23 Paper feed error
E24 Purge unit error
E25 ASF(cam) sensor error
E26 Internal temperature rise error
E27 Waste ink absorber full or platen waste ink absorber full
E28 Ink cartridge temperature rise error -
E29 EEPROM error
E33 Paper feed position error
E35 15 USB Host VBUD overcurrent error - USB
E37 17 Abnormal motor driver error
E40 20 Other hardware error
E42 22 Scanner error

Tuesday, January 20, 2009

Reset CANON PG40 PG41 ink counter cartrige


Try this
Dowload

Power off printer
Hold down STOP/RESET button then Press and Hold down Power button
Keep Power button down and Release STOP/RESET button
Push STOP/RESET button twice
Wait 20-30 seconds - our LED showed Idle
Push STOP/RESET button four times
Push Power button twice
Power off
Next time the printer is started the waste count will have been reset

Monday, January 19, 2009

Canon MP110


step by step
Reset Printer Canon MP110

1. Enter SERVICE MODE By pressing Menu-Scan-Copy-Scan
2. Enter NVRAM by pressing <--- or ---> then OK
3. Enter CMY ink level by pressing <--- or ---> then OK
4. Select 1 by pressing <--- or ---> then OK
5. Enter K ink level by pressing ---> then OK
6. Select 1 by pressing <--- or ---> then OK
7. Press reset ( design: // )

RESET CANON IX4000,IX5000


The PIXMA iX4000 lets you enjoy high-quality photo and document printing up to A3+.

As part of the PIXMA range, the iX4000 is built with FINE (Full-photolithography Inkjet Nozzle Engineering) technology which ejects consistent 2 picolitre ink droplets with remarkable accuracy for smoother, sharper and more detailed images.

The iX4000 is the perfect solution for the home or business who want to print large format documents, graphics and photos at an affordable price.

The service manual consists of the following chapters

-Maintenance
-Technical Reference
-Appendix

download resetter ix4000,ix5000

Saturday, January 10, 2009

Printer Epson Stylus T11


Description
Print speed : Up to 22 ppm black & up to 13 ppm color
Print quality : Up to 1440 rendered dpi black / 5760 dpi color
Cartridge : 73N Black / Cyan / Magenta / Yellow L (91N optional)
Paper Output : A4, A5, A6, C6, DL
PC/MAC Compatible, USB Connectivity, Weight 3.30 kg.


Download Adjustment program epson

Source :Download SSCL.com download software (v4.30)

Printer Canon Pixma iP3680


Description
Spesifikasi Printer Canon iP3680 :

Print speed : Up to 26 ppm black & up to 17 ppm color
Print quality : Up to 2400 rendered dpi black / 9600 dpi color
Cartridge : PGI 820 Black / CLI 821 Black, Cyan, Magenta, Yellow
Paper Output : A4, A5, A6, C6, DL
Duty Cycle : Up to 1000 pages
PC/MAC Compatible, Pictbridge, USB Connectivity, Weight 5.60 kg