1. There will be an icon on the desktop after finishing installing
SSC Service Utility software.
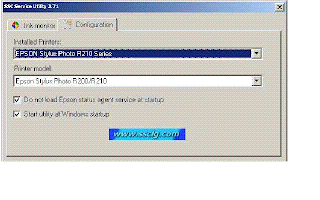
2. Click this icon; you can start the main menu as the below picture shown.

1) Choose the printer model which you’ve installed driver in the first grid.
2) Choose the corresponding printer model supported in second grid.(For some special printer models, such as
CX5100, you can choose CX5200)
3) Click the two choices in the small window below. The first one means don’t load Epson status agent service at
startup; and the second means starting utility at Windows startup.
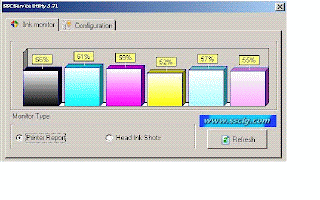
3. Click “REFRESH” and check whether ink volume is displayed as the following picture shown. If not or over
100%, it means the printer hasn’t been recognized. Then you can delete printer driver and re-install driver or
re-start the computer so that the printer can be recognized.

4. When the printer can be recognized, close the window. Then you will see a small SSCS image in the taskbar as
the below picture shown.
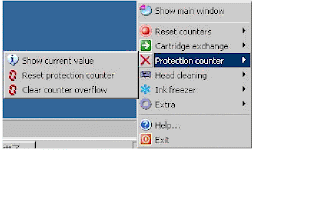
5. Click right button of mouse on SSCS image then you can start its functions.

6. “Protection counter” is the most useful function. When printer has printed lots of papers, it shall indicate, “the
components have reached its life span”. At this time, two lights on panel will blink alternatively. Actually the truth
is not like what the notice says. The reason for this problem is that EPSON has setup a “Printing Paper Record
Utility” on the mainboard. When finish printing the fixed pages, it will suggest changing the waste ink pad. In fact,
it still can be used for a long time. At this point, you can click the “Protection counter” and choose “ Reset
protection counter” to clear the records as below picture shown.
7. Click “Yes” when there a dialogue frame come out as below,.
8. Then click “OK”. The waste counter is resettled.
9. In the end, turn off printer and switch it back on again. Now you have finished the “SSC Procedure”.Download SSC
SSC Service Utility software.
2. Click this icon; you can start the main menu as the below picture shown.

1) Choose the printer model which you’ve installed driver in the first grid.
2) Choose the corresponding printer model supported in second grid.(For some special printer models, such as
CX5100, you can choose CX5200)
3) Click the two choices in the small window below. The first one means don’t load Epson status agent service at
startup; and the second means starting utility at Windows startup.
3. Click “REFRESH” and check whether ink volume is displayed as the following picture shown. If not or over
100%, it means the printer hasn’t been recognized. Then you can delete printer driver and re-install driver or
re-start the computer so that the printer can be recognized.

4. When the printer can be recognized, close the window. Then you will see a small SSCS image in the taskbar as
the below picture shown.
5. Click right button of mouse on SSCS image then you can start its functions.

6. “Protection counter” is the most useful function. When printer has printed lots of papers, it shall indicate, “the
components have reached its life span”. At this time, two lights on panel will blink alternatively. Actually the truth
is not like what the notice says. The reason for this problem is that EPSON has setup a “Printing Paper Record
Utility” on the mainboard. When finish printing the fixed pages, it will suggest changing the waste ink pad. In fact,
it still can be used for a long time. At this point, you can click the “Protection counter” and choose “ Reset
protection counter” to clear the records as below picture shown.
7. Click “Yes” when there a dialogue frame come out as below,.
8. Then click “OK”. The waste counter is resettled.
9. In the end, turn off printer and switch it back on again. Now you have finished the “SSC Procedure”.Download SSC